Showing posts with label tools. Show all posts

Sunday, 10 November 2013

Flash Drawing: The Eraser Tool


The Eraser Tool is, once more, very similar to the Brush Tool. In fact, it acts as a sort of reverse brush tool, erasing in the same manner as the brush paints. In the Tools panel, there's options regarding the size and shape of the eraser. There are also eraser modes, where you can limit what you erase so that you only get rid of strokes, fills, selections...

  • Erase Normal: Everything the eraser tool draws over is removed.
  • Erase Fills: The eraser tool only affects fills (i.e. things drawn with the brush tool, fills or fills made by the bucket tool).
  • Erase Lines: The erase tool only affects lines (i.e. outlines or lines drawn with the pencil, pen or pile tool).
  • Erase Selected Fills: Erases only selected fills.
  • Erase Inside: The eraser only paints inside an area. The 'inside' is determined by where your eraser stroke starts. Starting a eraser stroke in a shape means you will only paint inside the shape, while selecting an empty space means it will only paint in an empty space.

Flash Drawing: The Pencil Tool

The Pencil Tool (Y) at first sight is similar to the Brush Tool, but actually functions along different mechanics. While the brush tool can be used to both draw lines and crudely fill in areas, a pencil can only create lines.

When a stroke is drawn with the brush, Flash is actually tracing the thickness of the brush, placing appropriate anchor points around the outline, then filling the space with colour. However, Flash traces the centre of a pencil stroke, then creating the colour around it rather than inside it.


In the tools panel, you can control the pencil mode, which determines the smoothness of your stroke. Again, like with the brush tool, Flash interferes to make the most efficient line. With Straighten, Smooth and Ink options, you dictate how much Flash interferes or how much it simply follows your hand.


While the Pencil tool is selected, the Properties panel will contain multiple options that will let you control the width and general appearance (style, cap and join) of the line.


Style: The general appearance of the line. By default, the line is a solid straight line, but the drop-down menu will let you change the line so it's dashes, dotted... When clicking on the pencil button next to the drop-down menu, further editing options will come up that let you determine the frequency of dashes, the randomness of the ragged line... 

Cap: The ends --or caps-- of the lines. The cap can be either rounded or squared.

Join: The way lines meet, which can be mitered, rounded or beveled.


Friday, 8 November 2013

Flash Drawing: The Brush Tool

The Brush tool (B) is one of Flash's main drawing tools, letting you create brush-like strokes. The mode, size and shape of the brush can be changed from the tools panel.

 If you have a tablet installed, the tool panel also gives you tilt-sensitivity and pressure-sensitivity. These options are toggled on an off by clicking on their icons. With these sensitivities turned on, you can create alterations in the brush stroke by how hard or lightly you're holding the pen (pressure) or the angle of the pen (tilt).
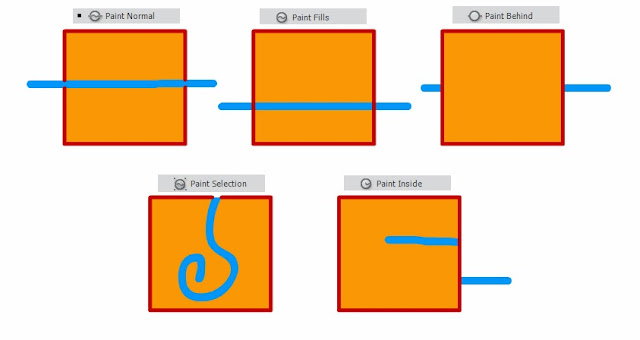


The brush mode dictates where the brush draws.
  • Paint Normal: The default of the brush. In this mode, the brush draws everywhere.
  • Paint Fills: The brush paints over fills, brush lines and empty spaces. It will not paint over strokes created by the pencil, line or pen tools, as well as strokes that appear automatically with shape tools. 
  • Paint Behind: The brush paints behind anything that's already there. 
  • Paint Selection: The brush only paints over parts which have been selected.
  • Paint Inside: The brush only paints inside an area. The 'inside' is determined by where your brush stroke starts. Starting a brush stroke in a shape means you will only paint inside the shape, while selecting an empty space means it will only paint in an empty space.


In programs such as Photoshop, the size of a brush is defined by the amount of pixels it will cover in the document. However, this works differently in Flash, and the brush is the area that your cursor will cover when touching the stage. As such, the same size of brush can create different widths of stroke depending on how zoomed in you are on the stage.

In the Properties panel while you have the brush selected, the smoothing of the brush can be altered. Again, since Flash is a vector program, brush strokes are made by anchor points itstead of pixels. Each anchor point is a point in the stroke's outline which, when conected, show what you have drawn. The smoothing option determines how many anchor points are in your brush stroke.

At the maximum extreme (100), Flash alters your brush stroke so that there's the fewest possible amount of anchor points. Unfortunately, this means that often your stroke will be very warped and looking little like your original intention.

At the minimum extreme (0), Flash will not interfere with your brush and will show you exactly what you have drawn. The brush stroke will have a more natural look, but the outline will not be as perfectly smooth.

Many artists go for lower numbers on the smoothing, between 0 and 50, which allows for a natural line with varying degrees of crispness.